SAP Table Creation, Maintenance, and Authorization
This article discusses SAP ECC steps related to the creation of a customized table, covering table maintenance through SM30 and table authorization.
Join the DZone community and get the full member experience.
Join For FreeCreating Customized Tables for Table Maintenance
Go to SE11 and give the table name that you want to create.
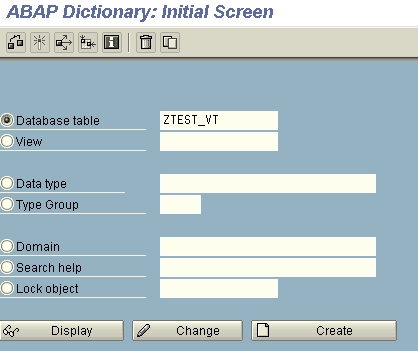
Give the Description of the table and enter the following details.
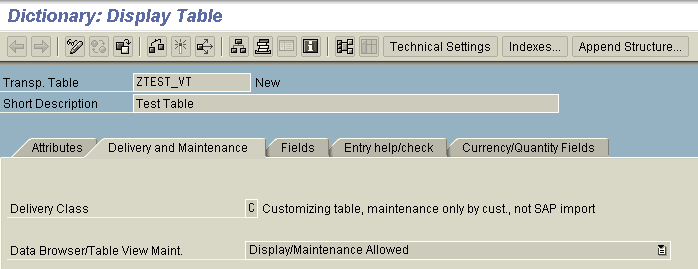
1. Delivery Class
Delivery Class Used For
- A - Application table (master and transaction data).
- C -Customer table: data is maintained by the customer only
- L - Table for storing temporary data
- G - Customer table, SAP may insert new data records, but may not overwrite or delete existing data records. The customer namespace must be defined in table TRESC. (Use Report RDDKOR54 here).
- E - System table with its own namespaces for customer entries. The customer namespace must be defined in table TRESC. (Use Report RDDKOR54 here.)
- S - System table, data changes have the same status as program changes.
- W - System table (e.g. table of the development environment) whose data is transported with its own transport objects (e.g. R3TR PROG, R3TR TABL, etc.).
2. Data Browser/Table View Maint.
Options Available
- Display/maintenance not allowed: The usage of standard table maintenance tools is not allowed.
- Maintenance and display of this Dictionary object is not possible in transaction SE16.
- Transaction SE54 does not allow the generation of a maintenance dialog, which means automatically calling transactions SM30/SM34 for this Dictionary object is no longer possible.
- Display/maintenance allowed to limited extent: Usage of standard table maintenance tools is allowed to a limited extent.
- Transaction SE16 allows the display function for this Dictionary object, but no maintenance.
- Generation of a maintenance dialog for this Dictionary object is possible using transaction SE54.
- Transaction SM30 does not allow maintenance and display functions for this Dictionary object
- Display/maintenance allowed: The usage of standard table maintenance tools is allowed:
- Transaction SE16 allows the maintenance and display functions for this Dictionary object. Note: If an SM30 maintenance dialog exists for this Dictionary object, it is called.
- Transaction SE54 allows the generation of a maintenance dialog for this Dictionary object.
- Transaction SM30 allows the display and maintenance functions for this Dictionary object.
Enter the Fields of the table.
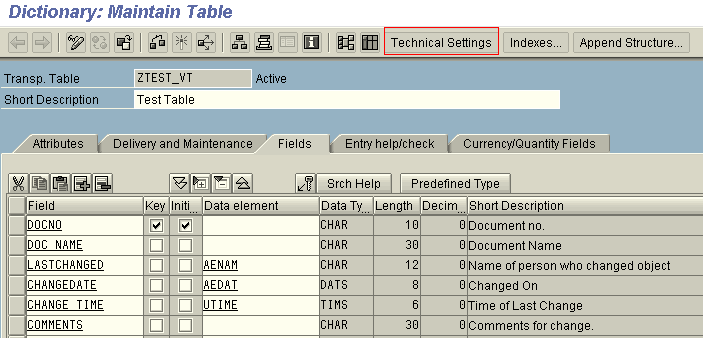
Significance of the Above fields:
- LASTCHANGED: Username of the person who created or changed the data.
- CHANGEDATE: The date on which the records was created or changed.
- CHANGE_TIME: The time on which the records was created or changed.
- COMMENTS: The reason for the changes made to be specified by the user.
Once all the fields have been entered then, click on Technical Settings and enter the following details on the next screen:
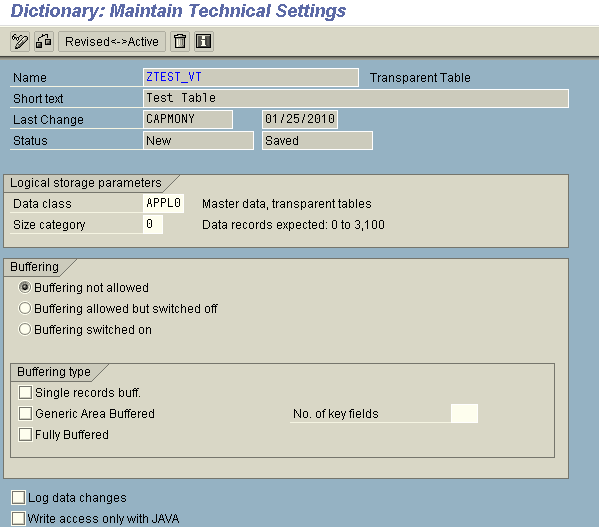
Data Class
The data class defines the physical area of the database (for ORACLE, the TABLESPACE) in which your table is logically stored. If you choose a data class correctly, your table will automatically be assigned to the correct area when it is created on the database.
The most important data classes are (other than the system data):
- APPL0: Master data
- APPL1: Transaction data
- APPL2: Organizational and customizing data
Master data is data that is frequently read but rarely updated. Transaction data is data that is frequently updated. Organizational and customizing data is data that is defined when the system is initialized and then rarely changed.
Two more data classes are available, USR and USR1. These are reserved for user developments, and the tables assigned to these data classes are stored in a table space for user developments.
Note: The data class only has an effect on table storage for the database systems ORACLE and INFORMIX.
Size Category
The size category determines the probable space requirement for a table in the database.
You can select categories 0 to 4 for your table. Each category is assigned a specific fixed storage area value in the database. When you create a table, initial space is saved for it in the database. If more space is required later due to data that has been entered, the storage space is increased in accordance with the category selected.
Press F4 on the field size category to see the number of data records that can be maintained for the individual categories of your table without complications ensuing. These complications could be for example a reorganization becoming necessary because the maximum space to be reserved for the table was exceeded due to the maintained size category.
Buffering Status
The buffering status specifies whether or not a table may be buffered.
This depends on how the table is used, for example, on the expected volume of data in the table or on the type of access to a table (mainly read or mainly write access to the table). In the latter case, for example, one would not select buffering.
You should, therefore, select:
- Buffering is not allowed if a table is not buffered.
- Buffering allowed but not activated if buffering is principally allowed for a table, but at the moment no buffering should be active. The buffering type specified in this case is only a suggestion.
- Buffering is allowed if the table should be buffered. In this case, a buffering type must be specified.
Buffering Type
The buffering type defines whether and how the table should be buffered.
There are the following types of buffering:
- single-record buffering --> Press F1 for more details
- generic area buffering --> Press F1 for more details
- full buffering --> Press F1 for more details
In generic area buffering, a number of key fields between 1 and no. of key fields-1 must be specified.
No. Of Key Fields for Generic Buffers
If you read a record from a generically buffered table, all records whose left-justified part of the key corresponds to that of this record (generic key fields) are loaded into the buffer.
This left-justified part of the key is determined in this field by entering a number n of key fields. The first n key fields of the table are thus the generic key fields.
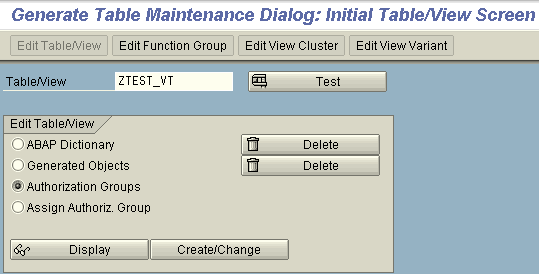
Create Authorization Object
To create an Authorization Object, go to transaction SE54.
Enter the Table/View name for which the Authorization object has to be created.
Select the Radio Button ‘Authorization groups’.
Then click on Create/Change.
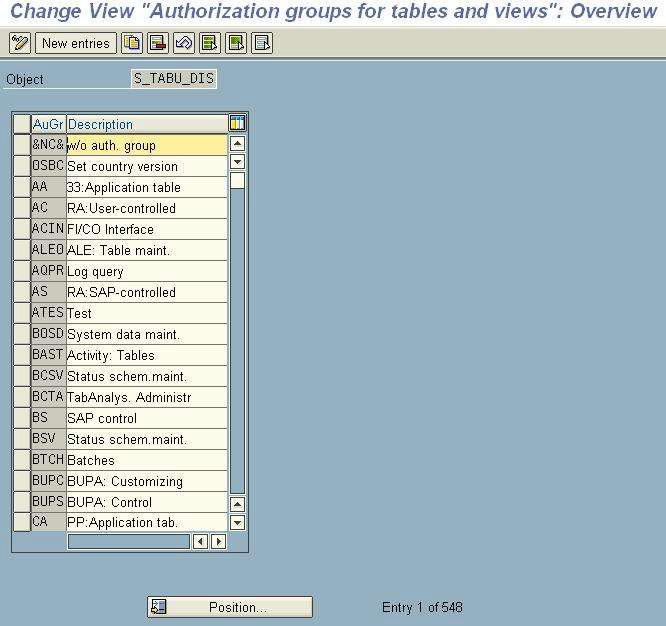
Then, the next screen will give a list of Authorization Objects that are already present in the system. You can Select one of them from the available list as per the requirement. But if the table demands a new authorization object then click on New Entries pushbutton given on the screen.
Enter the new authorization object name and description as shown in the screen below. The authorization object must follow a certain naming convention. (It should always start with 'Z'.) Click on Save.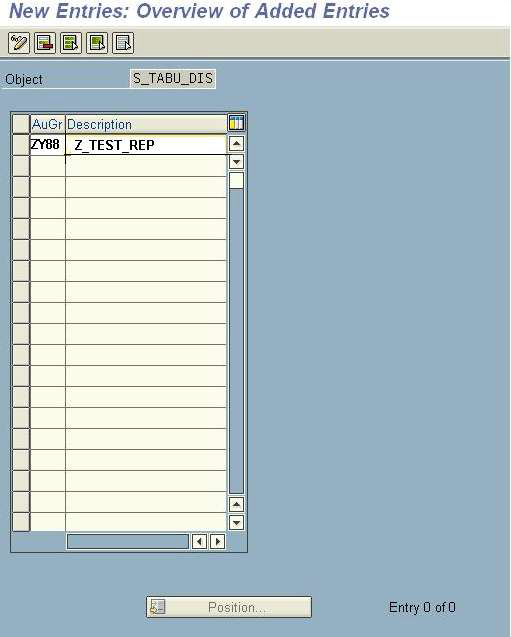
Table Maintenance Generator
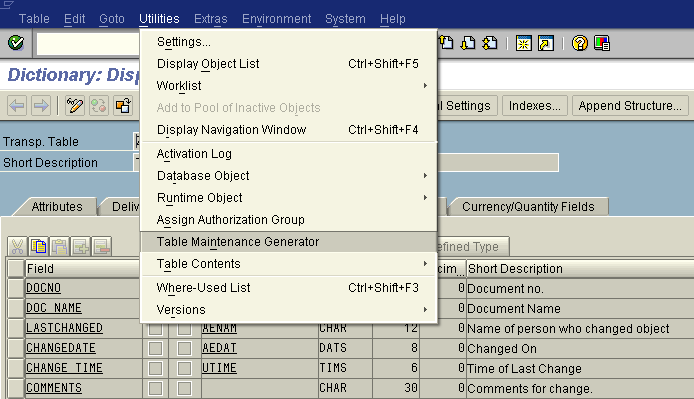
- Go to SE12 transaction. Open the table for which the table maintenance is to be implemented.
- Change it to the Editable mode and then click on Utilities -> Table maintenance generator.
Enter the following details on the next screen:
- Authorization group: Assigned/created for the table by following the procedure given in Section I.
- Function group: Name of the function group to which the generated maintenance modules will belong.
- Maintenance type: According to the table requirement, anyone should be selected.
- One step: Only one maintenance screen is processed during extended table maintenance. The entries are displayed in list form on this screen.
- Two step: Two maintenance screens are processed during the extended table maintenance:
On the Overview screen, the entries are displayed in list form.
One entry is displayed on the single screen. For every entry, the single screen can be called from the overview screen by pressing the function key.
Maintenance Screen No
According to the maintenance type selected, an overview screen and a single screen should be entered. Recording routine—This is an indicator of the recording routine that should be used for the table contents.
- Standard recording routine
- No, or user, recording routine
Compare Flag
This flag indicates whether the maintenance transaction allows the (checked) activation of Business Configuration Sets (BC Sets) and the adjustment. This is the case if the maintenance transaction can run in the background. There are four options present for the compare flag:
- No Information
- Not Adjustable
- Adjustable in Dialog
- Automatically Adjustable
Once done. Click on Create.
Exceptions
If changes are made to the table after the generation of table maintenance, table maintenance should be re-generated for the table.
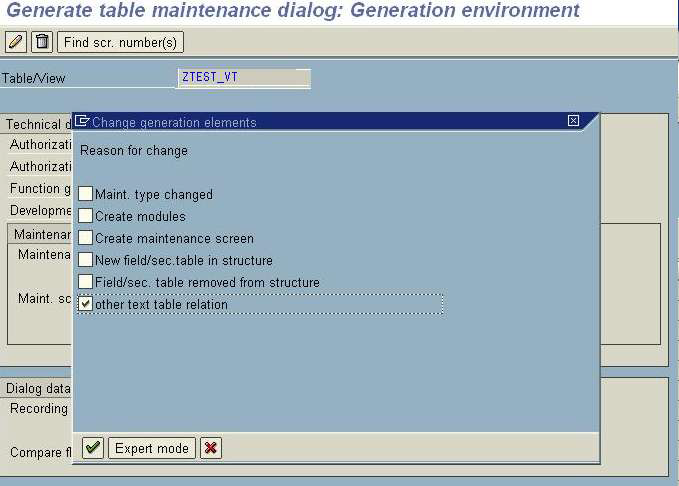
- Click on Utilities -> Table Maintenance Generator.
- Click on the Edit button. A pop-up would ask for Reason for change. Select the appropriate reasons.
- Then, Save the data.
- Go to System -> Status and copy the Program Name.
Changing the Source Code of Table Maintenance
If fields like last changed on, last changed by, etc., are present in the table, logic should be included to save them by the system.
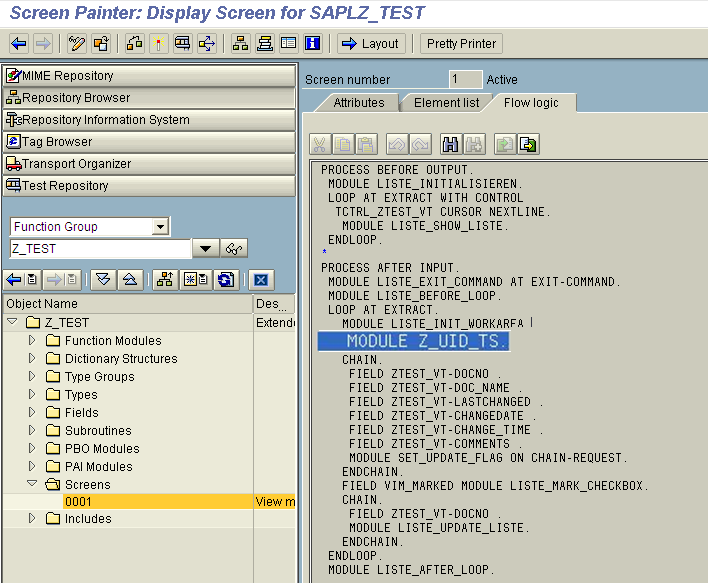
- Go to transaction SE80 and open the program that was received from the above logic.
- Go to the Screens drop-down list and click on 0001. In the PAI event of that screen, add a module to include the logic.
- Double-click on the module. It will ask for the ‘Include’ in which this module should be included.
- Select the Include where we need to include the logic.
![module Z]()
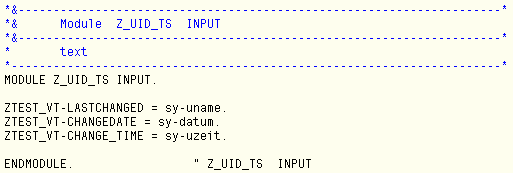
- Enter the logic to update the table with the parameters --> person responsible for making change, timestamp, etc. It is as shown below:
![logic update]()
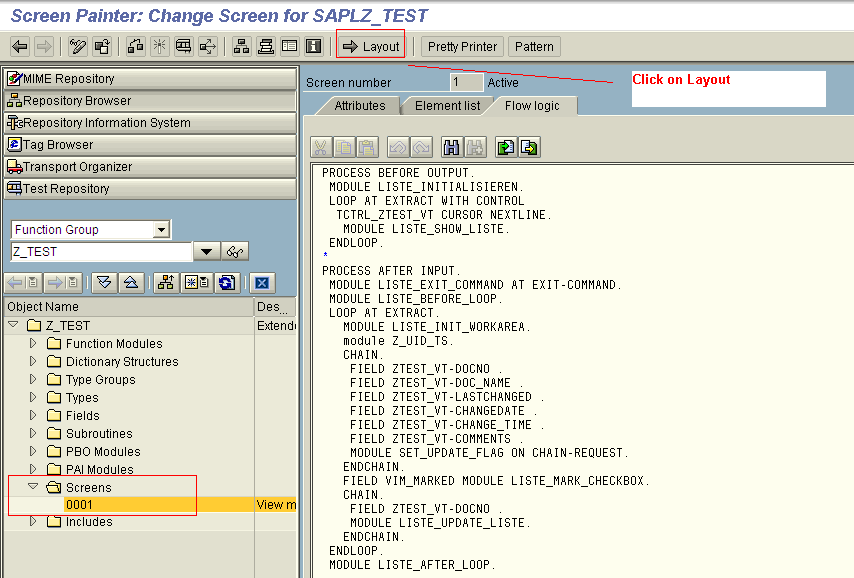
- Go to the layout of the screen
![layout]()
- Once you click on the Layout button, the screen below will appear.
![headings]()
- Enter the text to be displayed as the column heading in the output screen.
![enter text]()
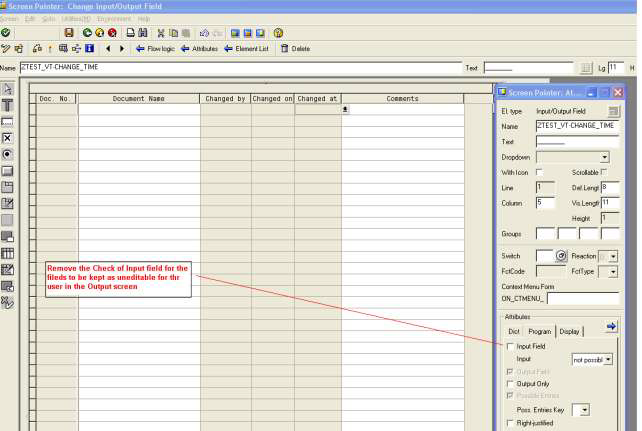
- Change the attributes of the fields of the table that are required to be non-editable as 'OUTPUT ONLY', i.e., the fields LASTCHANGED, CHANGEDATE, and CHANGE_TIME. The Columns will automatically be grayed out and uneditable on the output screen.
![input field]()
- Save and Activate the changes.


Create Transaction
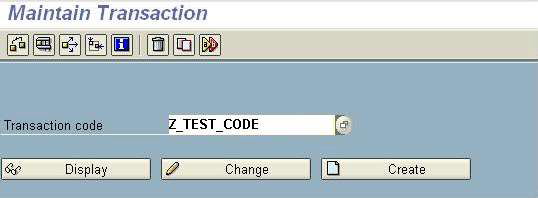
- To create a transaction, go to transaction SE93. Enter the transaction name which is to be created.
- Click on Create.
![create]()
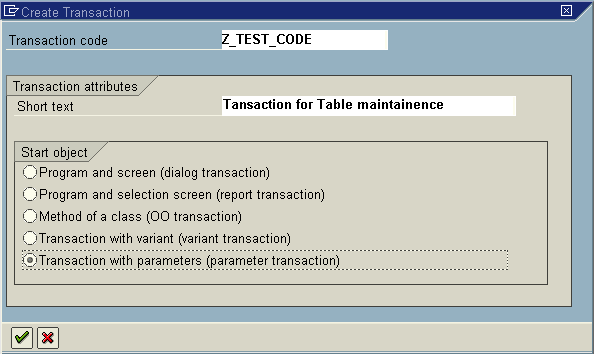
- Enter the Short text and the Start Object and select Ok.
![enter short text]()
- Enter the below details and the Click on SAVE
![enter details]()
- Enter the created T-code and the below screen would appear as output.
![Enter the created T-code and the below screen would appear as output.]()
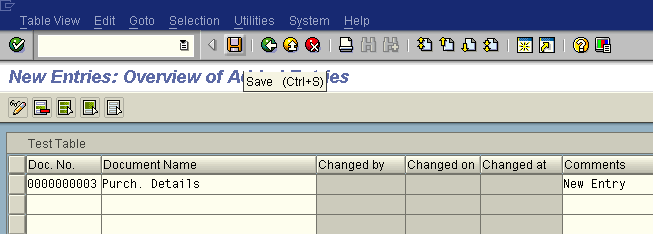
- Click on the New Entries button to create an entry in the table. Enter the details and then click on SAVE.
![Click on the New Entries button to create an entry in the table. Enter the details and then click on SAVE.]()
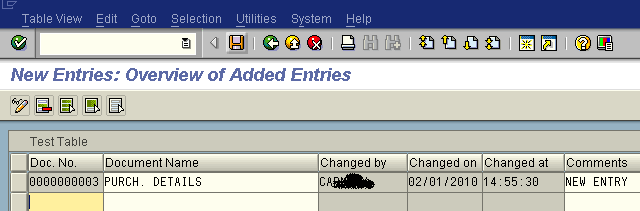
- As soon as you click on the save button the username, Date and Time appears automatically.
![As soon as you click on the save button the username, Date and Time appears automatically.]()
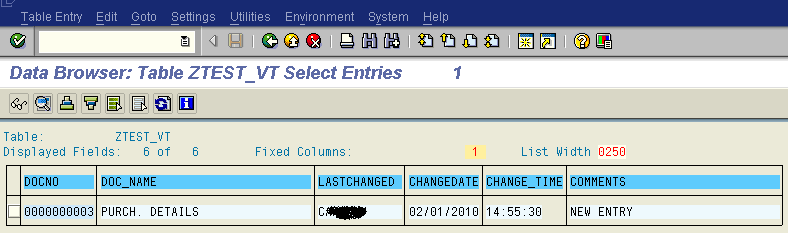
- You can check the same data in the Se16 transaction for the table.
![You can check the same data in the Se16 transaction for the table.]()

Applies To
ECC 6.0, S/4 HANA and BI 3. x and 7.0, 7.2, 7.3, BW on HANA etc.
To summarize, following the above step, you can Create a custom table, maintain the data in the table via SM30, and enable security authorization on that table.
Please note: This blog is for developers who are still using SAP S/4 HANA, ECC, and BW.
I hope I was able to give you a little insight into how the you can create, maintain and add security on a custom SAP table.
I would love to hear your suggestions, feedback, and questions. Please share the blog with your team members, colleagues, and friends working in SAP, and don’t forget to like and share the blog and follow me on DZone Maheshsingh Mony.
Opinions expressed by DZone contributors are their own.
Comments